Every business website and blogs need a contact form. It will help the customers to get in touch with you, clear the doubts about your product or get support. As of January 2020, WordPress is one of the widely used CMS for creating websites and blogs. Without writing a single line of codes, we will be able to create anything and everything we want.
Anyway, you could also find so many form builder plugins for WordPress. They will help us to create forms inside our blog in some simple mouse clicks.
Let’s move to our topic.
If you already have a form inside your blog, you probably know that some people are using it just for advertising. We may be created that form for support or anything related to our industry.
Those people will still use these forms for spamming. And now, we have got a solution for it! In this post, we are going to show you how you can eliminate spam through WordPress forms and clean your email box!
WPForms
If you are in the blogging field for a while, you probably know WPForms. WPForms is one of the beginner-friendly WordPress form builder plugin, which is created by the Awesome Motive team – the same company behind plugins like OptinMonster, MonsterInsights, SeedProd, RafflePress, etc.
You know we only recommend high-quality products for our users.
And WPForms is our favourite WordPress contact form plugin in the industry! We will be using WPForms for creating the form and their reCAPTCHA settings to eliminate spam.
How To Eliminate Spam Through WordPress Forms?
Creating a contact form using WPForms is pretty simple. They do offer a drag-and-drop form building wizard for creating forms.

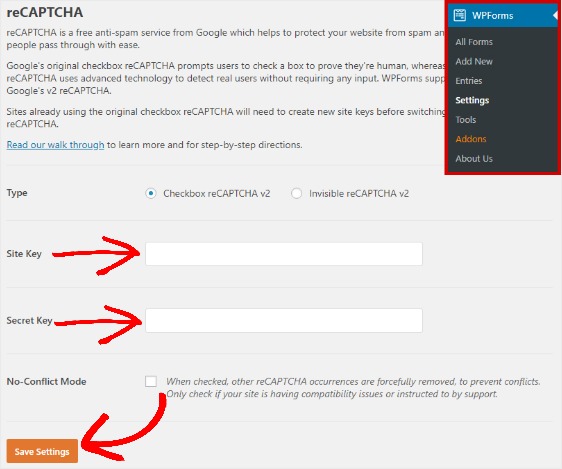
So when someone needs to reduce spam submissions, he might want to add captcha to the form. And thankfully, WPForms comes with that feature! From the WPForms Settings, you could configure the reCAPTCHA.

We recommend you choosing the reCAPTCHA v2.
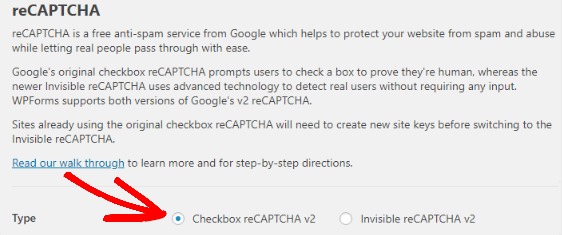
So, you could add a checkbox verification like this:

Once you got selected, you need two things.
-
- Site Key.
- Secret Key.
Go to this page and move to the admin console.
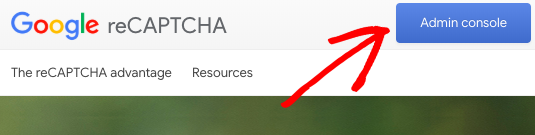
Then you need to log in to your Google account. Once you got logged in, you will be redirected to the dashboard. From there, you could add new websites.

While registering a new website, you need to label it.
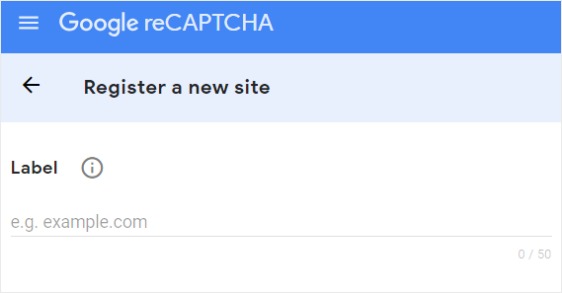
This is just for identification. You could give any name you’d like.
The next step is choosing the CAPTCHA type.
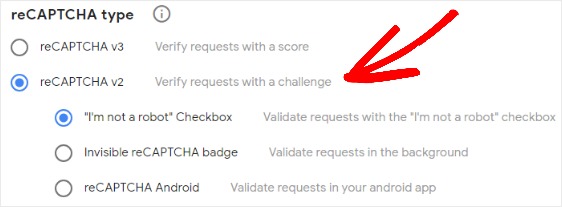
Just like we configured in the WPForms settings page, we have chosen the V2, checkbox CAPTCHA. Now, add the domain name you need to use the CAPTCHA.
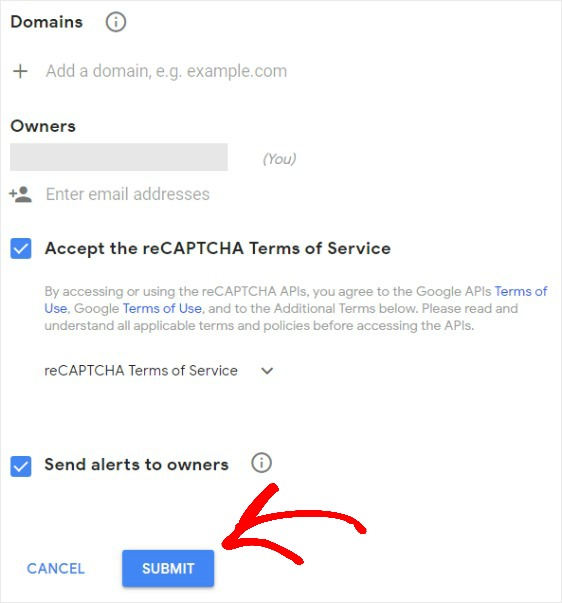
You don’t need to add the http or https protocol. Just domain.com will do the job. Once you got did that, submit.
And almost instantly, you will get the site key, secret key on the screen.
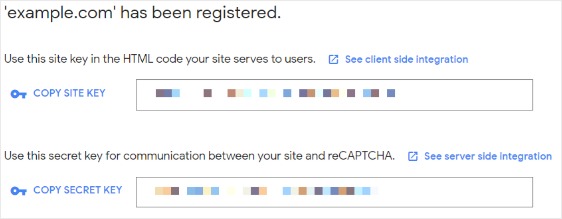
Copy those keys. Go back to your WPForms settings page. Then, paste those keys in the field and save the settings.
Now, we have almost completed the process. The next and final step is, add the captcha box to your contact forms. So, you could create a new contact form or even edit the existing one.
In the form builder, you could see the form’s settings. Under it, go to general settings. And from there, you could enable the reCAPTCHA checkbox.
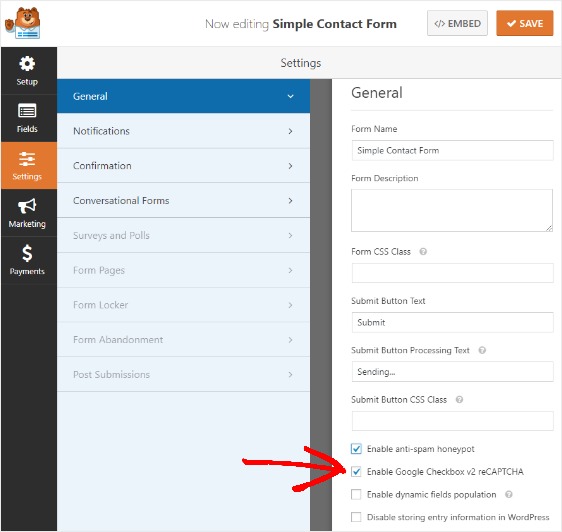
And after making this change, adding required form fields, save the form.
You need to embed the form to the page you want. WPForms is complete;y optimized for Gutenberg. So, if you are using the Gutenberg editor, you can easily add the WPForms block to the page, insert the form.
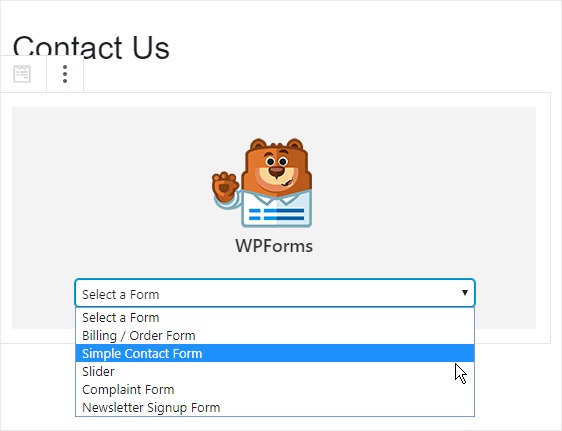
In case if you are not using the Gutenberg editor and still using Classic Editor, you can insert the form using the specific shortcode you have got.
And if you check the page from the frontend, you could see that the reCAPTCHA checkbox got added successfully.
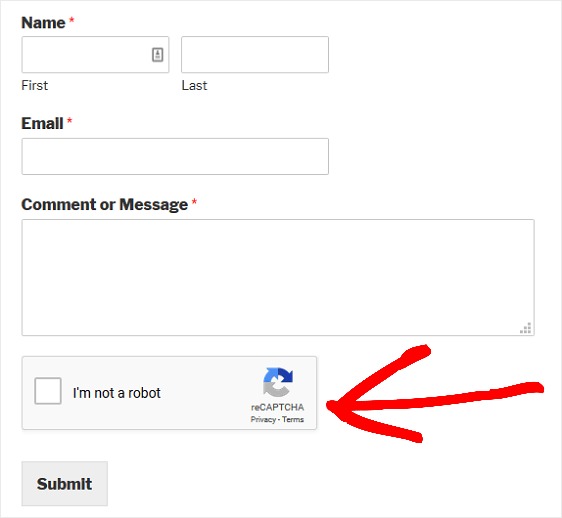
This way, you could prevent bots from submitting and sending you automatic emails! Simple, isn’t it?
Get WPForms
Are you ready to get your hands on the WPForms premium? From below, you could take it!
We hope you found this post useful and enjoyed the read. If you did, please consider sharing this post with your friends and fellow bloggers on social media. For more awesome posts, you could check out our blog section.
Leave a Reply